
Hoofdmenu
Datamanager
Favorieten
Hier vindt u uw favoriete Mulcol oplossing(en). U kunt hiervoor de Mulcol Multiselector gebruiken.

Multiselector
Via deze functie schakelt u over naar de Multiselector, waarmee u uw geschikte product en oplossing snel en eenvoudig kunt vinden.
Account
Hier vindt u alle gebruikers die toegang hebben tot het account. Daarbij staan hun gegevens vermeld en welke rol zij hebben.
Berichten
U kunt in het berichtencentrum over project of markers onderling communiceren naar toegewezen gebruikers.
Support
De support-afdeling van Mulcol helpt u graag met vragen over het Mulcol Registratiesysteem.
Producten
Hier staan de producten die Mulcol in het assortiment heeft en die u kunt selecteren voor uw project in het Mulcol Registratiesysteem.
Website
Via deze link gaat u terug naar de homepage www.mulcol.com
Uitloggen
Hiermee kan u handmatig uitloggen.
Inrichten
Inrichten
Bij het account maakt u de verschillende gebruikers aan. Bij iedere gebruiker geeft u aan welke rol zij hebben in de Mulcol Datamanager. Dit doet u door ‘Type gebruiker’ te selecteren. Aan te raden is om één hoofdaccount aan te maken met één of meerdere superuser-accounts.
Bij iedere gebruiker vermeld u het (zakelijke) e-mailadres, dat is nodig om de uitnodiging en eventuele berichten te kunnen ontvangen.
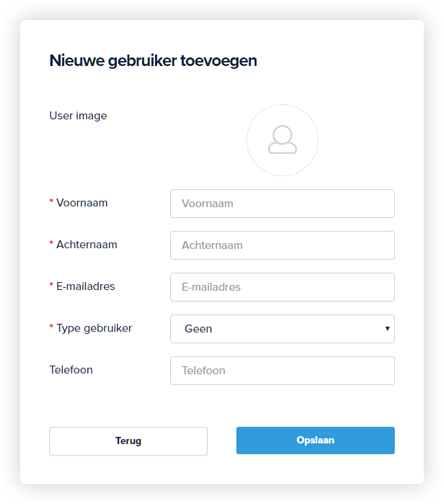
Gebruikers toevoegen
Aan te raden is om één hoofdaccount aan te maken met één of meerdere superuser-accounts
Gebruikersrechten
Ieder type gebruiker heeft een aantal autorisaties en gebruikersrechten. Onderstaand rechtenoverzicht is van toepassing bij gebruik van de Datamanager op desktop en tablet.
Algemene functie(s)
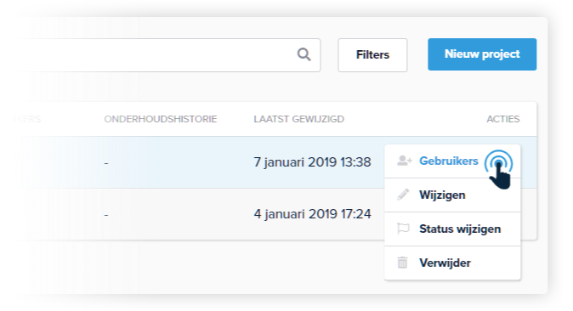
Door de Datamanager heen zijn algemene functies verwerkt onder de knop ‘Acties’ waar u diverse opties en mogelijkheden vindt.
Een project aanmaken
Een project aanmaken
Onder de Datamanager vindt u het kopje ‘Projecten’. Hier kunt u een nieuw project aanmaken. Een project is veelal één gebouw, waarvan u de verschillende velden kunt invullen. U kunt meerdere projecten toevoegen door op de button ‘Nieuw project’ te klikken rechtsboven in de hoek.
Niet alle velden zijn verplicht maar raden aan om de projectgegevens zo compleet mogelijk in te vullen. Deze gegevens worden namelijk gekopieerd naar het Logboek waarvan een PDF versie gecreëerd kan worden.
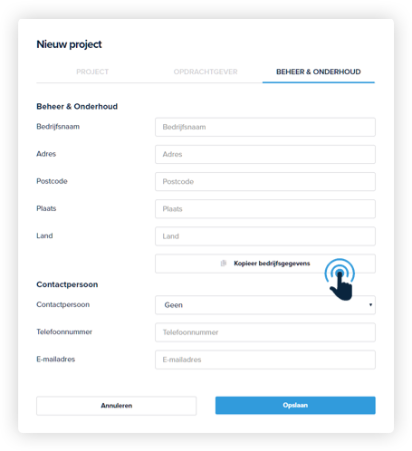
Kopieer gegevens eenvoudig
Onder ‘Beheer & Onderhoud’ kunt u eenvoudig en snel u eigen bedrijfsgegevens invullen door middel van de ‘kopieer’ button.
Wanneer u klaar bent met invoeren, dan klikt u op ‘Opslaan’.
Gebruikers toevoegen
Voeg (meerdere) gebruikers toe aan het project om met elkaar te registreren, communiceren en informatie te delen. Dit doet u door onder de actie knop gebruikers te selecteren.
Bouwdeel of Plattegrond aanmaken
Nadat u een project heeft aangemaakt, kunt u zelf bepalen hoe u het project inricht door een nieuw bouwdeel te kiezen of nieuwe plattegrond aan te maken.
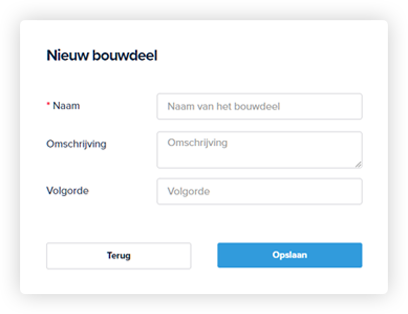
Bouwdeel
Een bouwdeel maakt u aan als u bijvoorbeeld een project hebt met verschillende vleugels, ook wel bouwdelen genoemd. Hiervoor gaat u naar ‘Projecten’ en vervolgens klikt u bij het betreffende project op ‘Nieuw bouwdeel’. U vult de naam en eventuele omschrijving in en bij volgorde geeft u aan in welke volgorde u de bouwdelen wilt laten tonen. Dit is handig voor een duidelijk overzicht.
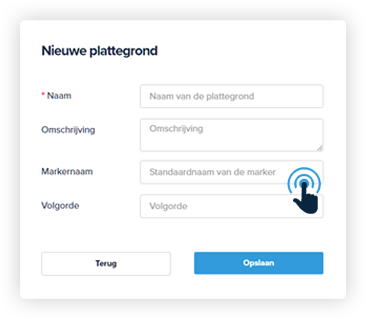
Plattegrond
Naast een bouwdeel kunt u ook een plattegrond aanmaken. Kies ‘Nieuwe plattegrond’ en vul de benodigde informatie in. Er is een optie om de markers die geplaatst worden op de plattegrond een eigen naam te geven. Hiervoor vult u het veld ‘Markernaam’ in.
Om een tekening van het gebouw toe te voegen klikt u desbetreffende plattegrond aan en voegt u een tekening toe. Deze kan geüpload worden als een .pdf, .jpg of .png-bestand. Wanneer u de tekening upload, dan heeft u de mogelijkheid om deze bij te snijden, ofwel te croppen.
Project met verschillende bouwdelen?
Voer ze apart in door meerdere bouwdelen toe te voegen.
Voeg een plattegrond toe aan een project
Voeg eenvoudig een bouwtekening toe.
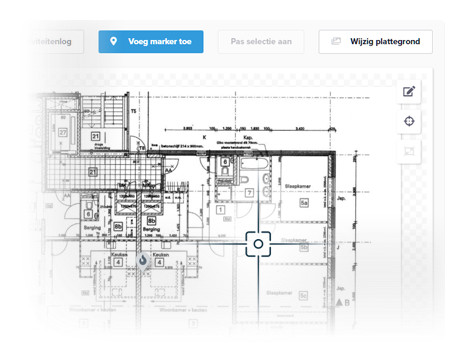
Marker toevoegen
Marker toevoegen
De markers die toegevoegd worden zijn de locaties van de brandwerende afdichtingen bij doorvoeringen. Door de plattegrond te verschuiven verschijnt de ‘crosshair’ functie waarmee u exact kunt bepalen waar u een marker wilt positioneren. Met ‘Voeg marker toe’ wordt een nieuwe marker in de plattegrond toegevoegd. Met het scrollwiel van uw muis kunt u bovendien de plattegrond in- of uitzoomen.
Copying a marker
Wanneer u identieke doorvoeroplossingen heeft, dan kunt u een marker eenvoudig dupliceren. Dit doet u door de marker te selecteren en te klikken op ‘Dupliceren’. Ook deze gedupliceerde marker krijgt altijd automatisch een nieuw ID.
Marker toevoegen
Door middel van de ‘crosshair’ functie kunt u gemakkelijk markers op de juiste plaats zetten.
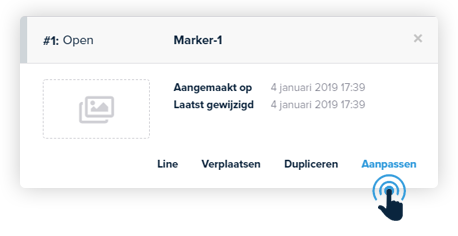
Marker aanpassen
Iedere marker heeft een uniek ID dat niet gewijzigd kan worden. De markernaam kan desgewenst wel aangepast worden.
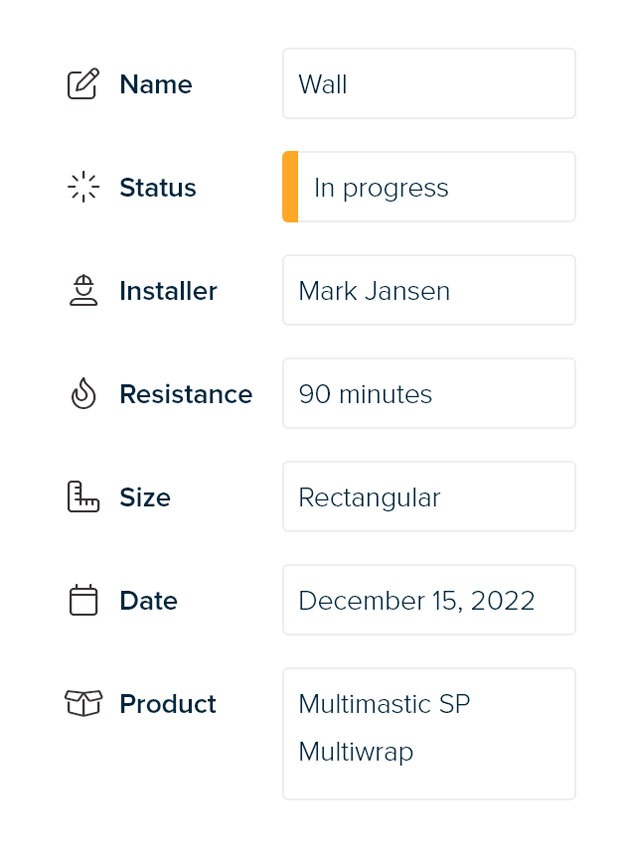
Alle kenmerken en details van de brandwerende afdichting voert u in door de betreffende marker te selecteren en vervolgens te kiezen voor ‘Aanpassen’.
Invulling ID marker
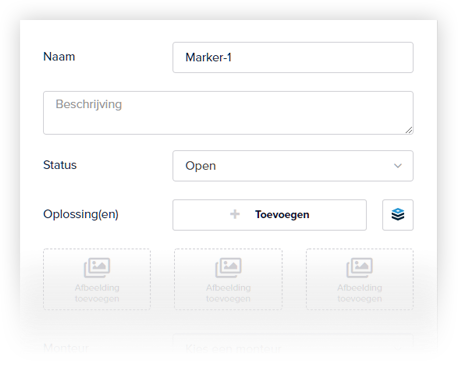
Naam
Hier kunt u de markernaam wijzigen.
Beschrijving
Hier kunt u extra informatie noteren betreffende de marker. *
Oplossing(en)
Hier kan een Multiselector oplossing gekoppeld worden aan de marker zodat u direct kunt aangeven hoe en met welk product de sparing brandwerend afgedicht moet gaan worden.
Afbeelding toevoegen
Upload een afbeelding uit bestand of laad direct in vanaf uw camera.
Monteur
Naam van de persoon die de brandwerende afdichting heeft gemaakt. *
Datum applicatie
Noteer hier de datum wanneer de brandwerende afdichting gemaakt is.
Brandwerendheid
Selecteer de brandwerendheid die geëist is.
Type constructie
Kies hier het type wand of vloer constructie.
Sparingafmeting
Voeg de afmeting van de sparing in de constructie toe. *
Type doorvoering
Selecteer het aantal en type installatiedoorvoering.
Doorvoerafmeting
Voer de grote van de doorvoering in. *
Type isolatie
Kies hier de isolatie die rondom de doorvoering toegepast is.
Producten
Selecteer de toegepaste Mulcol producten.
Extra opmerking(en)
Extra veld voor aanvullende opmerking over de aangebrachte brandwerende afdichting.
* Deze informatie wordt niet getoond in het Logboek (pdf)
Status van de Marker
Status van de Marker
Door elke marker een status te geven ziet u snel en duidelijk de voortgang van uw brandwerende afdichtingen. Er zijn verschillende mogelijkheden waaruit u kan kiezen:
Multiselector oplossing koppelen aan een Marker
Zodat u direct kunt aangeven hoe en met welk product de sparing brandwerend afgedicht moet worden.
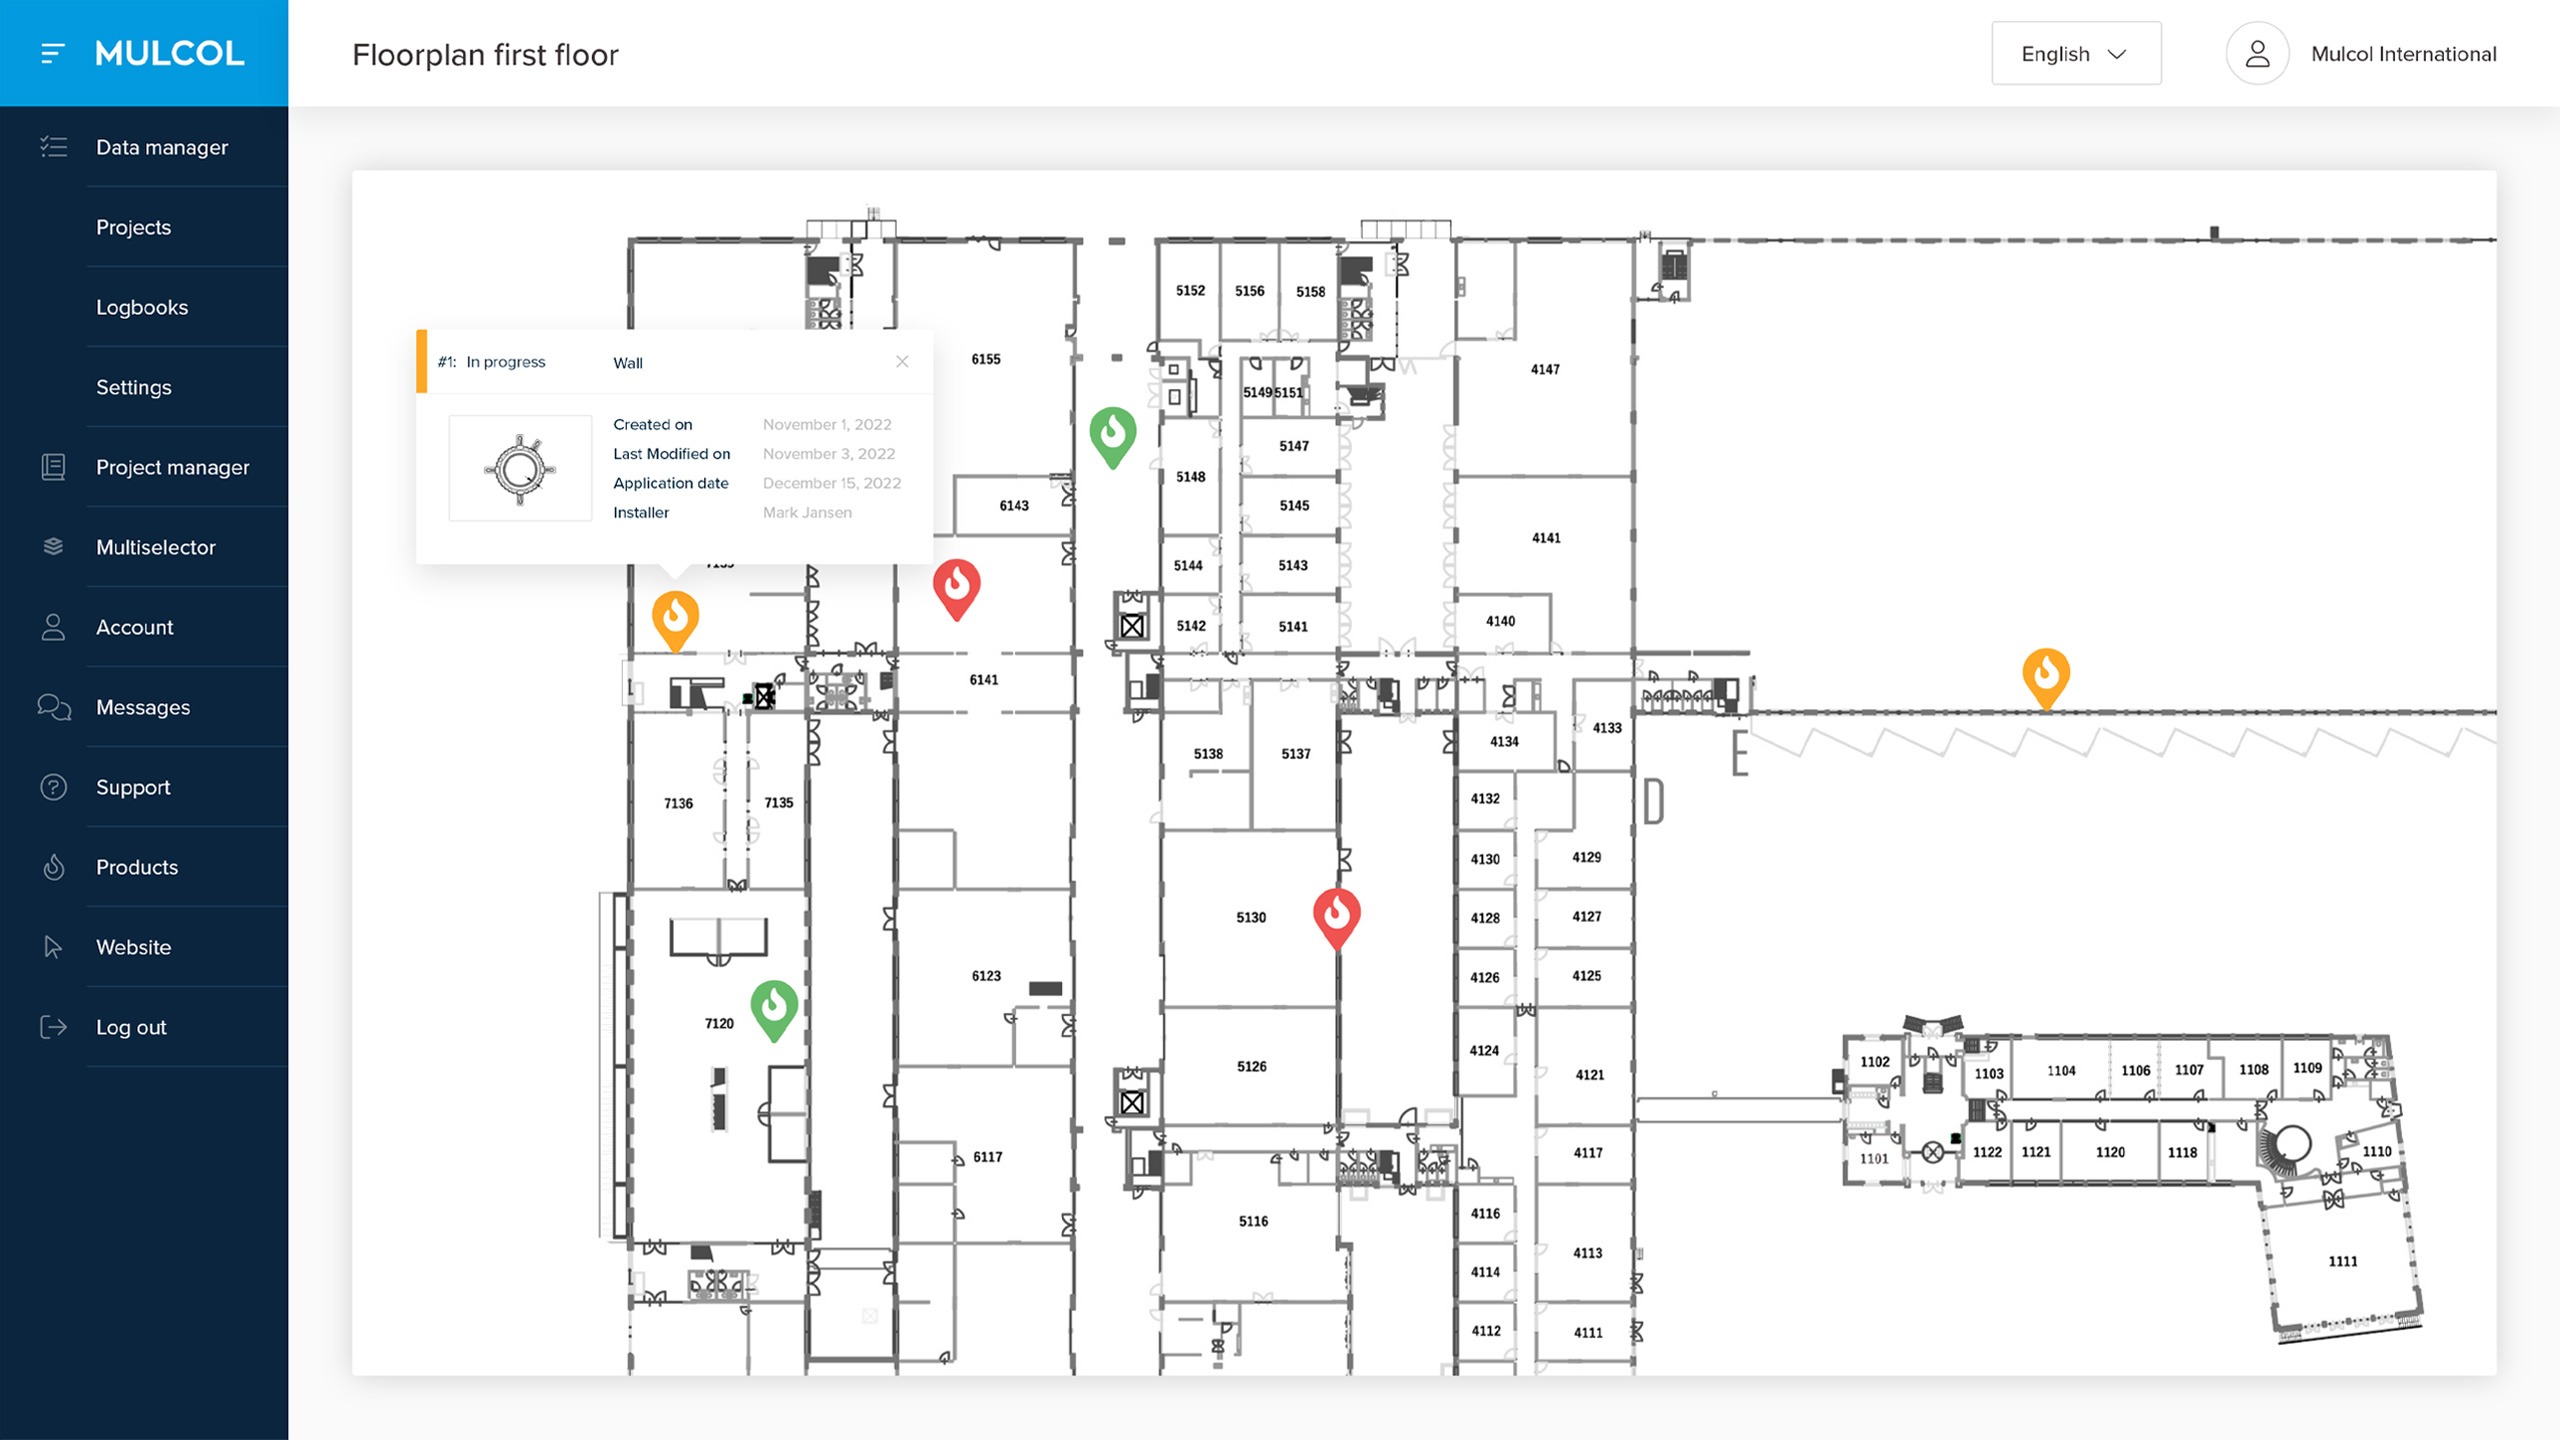
Overzicht Markers & Plattegrond
Overzicht Markers & Plattegrond
U heeft nu een digitale plattegrond waarop met markers aangegeven staat waar een brandwerende afdichting zit en wat de details en de status ervan is. Bovenaan de plattegrond kunt u meerdere markers selecteren, door ‘Selecteer markers’ aan te klikken en door vervolgens de betreffende markers op de plattegrond aan te klikken. Met het onderste icoon (de)selecteert u alle markers in één keer.
U kunt ook de plattegrond centreren , waardoor u weer een compleet beeld krijgt.
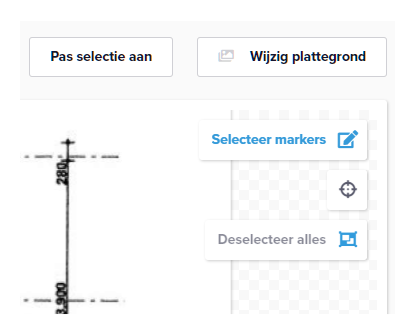
Vervang plattegrond
Tenslotte is het ook mogelijk om de complete plattegrond te vervangen door een actueler exemplaar door op ‘Wijzig plattegrond’ te klikken.
Goedkeuren en Onderhoud
Goedkeuren en Onderhoud
Wanneer een plattegrond is voorzien van de betreffende brandwerende afdichtingen (markers), dan kan een superuser hierop een controle doen en in één keer alle markers de status ‘Goedgekeurd’ geven. Dit gebeurt door alle markers te selecteren en via de optie ‘Pas selectie aan’ de status aan te passen. Deze functie is ook erg handig voor periodiek onderhoud.
Berichten versturen
Wanneer bij een marker een opmerking of een vraag gesteld wordt, dan kan bijvoorbeeld de superuser hierover een bericht sturen naar desbetreffende gebruiker. Dit gebeurt via het berichtencentrum of direct vanuit de marker.
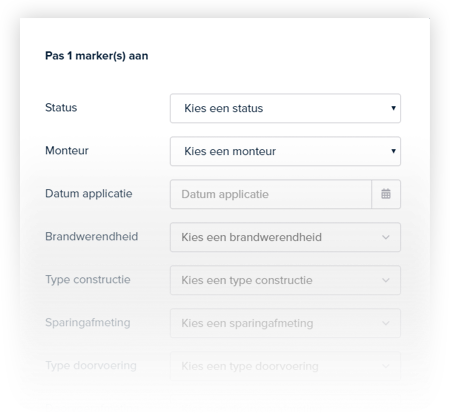
Alle markers aanpassen
Bij een controle kunt u gemakkelijk de status van alle markers in één keer aanpassen.
Logboek & Multiselector
Logboeken
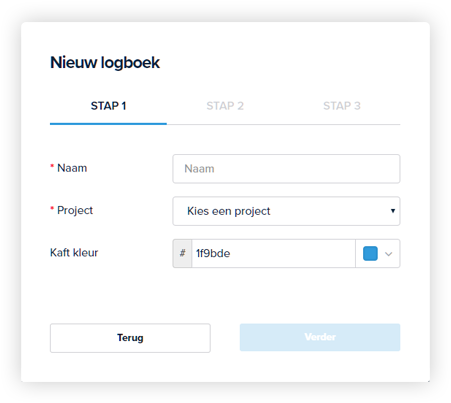
Wilt u een logboek van een project digitaal opslaan? Of vraagt een instantie hierom? Dan kunt u dit eenvoudig als pdf-bestand opslaan of versturen. Ga daarvoor naar ‘Logboeken’ en maak een nieuw logboek aan. Kies bij stap 2 de betreffende plattegrond.
Voeg daarna eventuele bijlage(n) toe, zoals bedrijfscertificaten of onderhoudscontracten. Het ‘titelblad’ wordt toegevoegd bij de index van het logboek. Bijlagen zijn handig te beheren via de bibliotheek zodat het toevoegen van bestanden nog sneller gaat. Hierna wordt het logboek gegeneerd en verschijnt als document onder het kopje logboeken. U kunt het logboek e-mailen, downloaden of printen.
Maakt u zich geen zorgen over het ontbreken van testrapporten, productbladen of andere technische documenten van de toegepaste producten bij de markers. Deze worden automatisch toegevoegd bij het creëren van het Logboek.
Multiselector
In de Multiselector zoekt u de oplossing op die u nodig hebt voor het brandwerend afdichten van de sparing. Deze oplossing kunt u direct toevoegen onder uw project of toevoegen aan uw Favorieten en desgewenst e-mailen, downloaden of printen.
Favorieten
Brandwerende oplossingen die vaker voorkomen kunt u ook in uw ‘Favorieten’ zetten, waardoor u ze sneller kunt selecteren en toevoegen aan projecten.
Logboek
U kunt het logboek e-mailen, downloaden of printen.